Understanding How Push Notifications Work
October 21, 2024 · Field NotesPush notifications were first introduced by Apple for iOS in 2009. Now we can’t imagine building any application without these.
Any push notification flow is mainly orchestrated using two entities, push providers and push service. The complexity of how you manage these notification subscriptions or how the events are queued or handled could vary. But these core concepts remain the same.
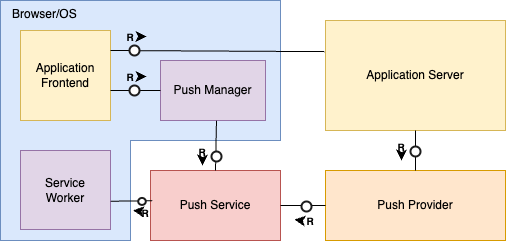
A push notification system involves:
- Service Worker: The worker (just a JavaScript file) which runs in the background even when the application is closed, to receive the notifications.
- Client: The application or browser/OS receiving the notification (usage is contextual at least in this article).
- Push service: The service provided by the browser/mobile OS to register clients, receive and authenticate notifications and forward them to the designated client.
- Push provider: The service responsible for receiving a call from your application and sending notification to the push service.
- Application Server: Your application’s backend.
Registering with Push Service
When an application which intends to send notifications opens up for the first time, it requests permission to send notifications. This does a bunch of things:
- Grants the application, permissions on browser and OS level to send the notification
- The application registers a service worker with the browser which would run in the background even when application is closed, listening for any “push”.
- The application also “subscribes” to the push service using PushManager API provided by the browser or mobile OS.
(All these have to be handled by the application, of course).
Now app permissions and background workers are topics of their own. For push notifications, we’ll mainly be focusing on the Push Service registration — the last step, which generates a subscription object. This contains an endpoint along with some authentication keys.
{
  endpoint: "https://fcm.googleapis.com/fcm/send/dFDkl2U:APA91bGJ14dMIPffpA118U9P9DZ_zFDF3Ag_Ce8XdGQ78FB8OXX5cmBwr",
  expirationTime: null,
  keys: {
    p256dh: "BIa2ZOsi4-hZ2A1VH-gSwTiEQVcR8CxbBeUG0t6....",
    auth: "Reh74y36Laj9873hCJWyUA"
  }
}
This subscription object is unique to each subscription and needs to be persisted to the application server along with the client/user information to send the notification to this particular client.
Notice the subscription object mentioned above, provides a Firebase Cloud Messaging (FCM) endpoint. This is because this endpoint was requested using Chrome. The push service being used depends on the client(browser/mobile OS). If it was Edge, the endpoint would look something like “https://wns2-pn1p.notify.windows.com/w/?token=BQYAAADjsm1etl…”.
Sending Notification via Push Provider
Push provider is part of the backend which is responsible to actually send the notifications. It could be a managed service or a custom one. Most cloud platforms offer a push provider service. But if you want more control, or don’t use a cloud provider — you will need to build a custom notification service.
To send the notification, when any notification-worthy event happens, you need to use the subscription object persisted in the previous section.
Libraries like web-push make sending the notifications easier.
webpush
.sendNotification(subscription, payload)
.then((response) => {
  console.log("Notification sent successfully:", response);
  res.status(201).json({ message: "Notification sent" });
  })
.catch((error) => {
  console.error("Error sending notification:", error);
  res.status(500).json({ error: "Failed to send notification", cause: error.body });
});
Internally, it uses the endpoint from the subscription object to send the request with ‘payload’ as the body.
This request is sent to the push service, which in turn notifies the client. If the client is offline at that moment, the push service stores and queues the notification for some duration (maybe few weeks), and notifies the client once online. The push event is then caught by the service worker — which can handle it or show it as a notification to the user.
There’s one missing piece in what we have talked about up until now — is this secure? Letting anyone subscribe and push to your machine can have dangerous consequences — someone not authorized to send notifications can send you the notification if the person gets hold of the subscription object. That’s where VAPID comes into picture.
VAPID Keys
VAPID (Voluntary Application Server Identification) is used by the push provider to identify and authenticate your application server. You can say it’s your application’s identifier.
From abstract of VAPID specification:
An application server can voluntarily identify itself to a push service using the described technique. This identification information can be used by the push service to attribute requests that are made by the same application server to a single entity. This can used to reduce the secrecy for push subscription URLs by being able to restrict subscriptions to a specific application server. An application server is further able to include additional information that the operator of a push service can use to contact the operator of the application server.
If you’re using a cloud push provider, it should offer you some way to get the VAPID keys associated with your push provider instance. If you are implementing a custom push provider, here’s how to generate VAPID keys:
const webpush = require('web-push');

const vapidKeys = webpush.generateVapidKeys();
console.log('VAPID Public Key:', vapidKeys.publicKey);
console.log('VAPID Private Key:', vapidKeys.privateKey);
Run this for once and save them (in an environment variable maybe). You can also use some VAPID key generator service.
These VAPID keys are used at two junctions of the above notification flow:
- When registering a client with the push provider: The request for subscription is made with the VAPID public key. This lets the push provider know, that the client requesting the subscription is associated with your app — and it stores this information.
navigator.serviceWorker.ready.then(function(serviceWorkerRegistration) {
  serviceWorkerRegistration.pushManager.subscribe({
    userVisibleOnly: true,
    applicationServerKey: urlBase64ToUint8Array('<Your Public VAPID Key>')
  })
  .then(function(subscription) {
    console.log('Received PushSubscription: ', JSON.stringify(subscription));
    // Send the subscription to your server to save it in your database
  });
});
- When sending the push notifications: The push provider signs the notification being sent to push provider with the VAPID private key. Upon receiving this request, the push provider uses the VAPID public key it already has to verify that the request is actually coming from your application using asymmetric cryptography. It also verifies that your application is authorized to send notification to the specified client.
To summarize:
- Application/push provider generates VAPID keys for itself.
- Application requests permission from user to send notifications.
- If user accepts:
Application registers a service worker with the browser.
Application requests subscription via PushManager from the Push service of the underlying browser/OS along with the VAPID public key. - Push service stores the VAPID public key corresponding to the client and application information and grants a subscription object with an endpoint to send notifications and some auth keys.
- Subscription is persisted on the application’s backend along with the user and client information.
- When notification needs to be sent, application notifies a push provider.
- The push provider sends request to the “subscription” endpoint persisted on application side. This request is signed with the VAPID private key.
- Push service verifies using the VAPID public key it stored earlier that the request is legit and the application is authorized to send notification to the said client.
- Push service triggers a “push” event on the service worker.
- Service worker handles or displays the notification.